|
Friday, July 28, 2006
the ambigram tutorial part 1
This may be late in the game, since my ambigram post was like last month already. But I just wanted to share, just in case of you are motivated to try this with your own name. Especially if you're equipped with Photoshop. I'm going to try to walk you step by step through the process. Disclaimer though - the success of your ambigram will depend on your visualizing prowess of things upside-down. Good luck!
Step one. Type your name in a nice, gothic and somewhat elaborate font. I've used here Gothic Love Letters. Other choices include Beaverton Tthorm and Indoctrine. Make it as big as 60 or 72 so when you zoom into the details later on, it won't be as pixelized. You may also want to adjust the spaces of the letters by going into character options and selecting the bigger values (see image on right). 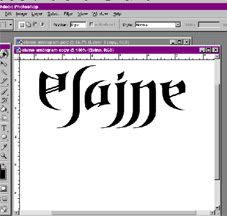  Step two. Rasterize your layer. Right click on the active text layer and click "Rasterize Layer". This will enable you to modify your text more freely. You may want to rename the layer according to the name you're typing. In this case, let's call it "Elaine".  Step three. Let's start with the first letter. With the "Elaine" layer selected, use your polygonal lasso tool. Make a series of clicks around the letter E, close the lasso, and right click. There should be a tab where you can select "Layer via Cut". Now there's a new layer just for the E. That's the first sub-step. Now you need to right click on this E layer and select "Duplicate Layer". To complete this second sub-step, rotate the layer until it's inverted. I've colored the inversion red for clearer reference. Do note that I'm overlaying another E because it's my last letter. 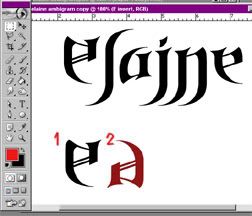 Step four. The next thing to do is to drag these two E's such that they are on top of each other. Now this is where your imagination will come in. Again, keep in mind that when inverted, this first letter should also serve as your last letter. Lucky for "Elaine", both are E's. Think of how it will look like inverted and make some trimmings here and there. If you make a mistake, there's always Ctr-Z. What I've done here is shortened the upper left tab and erased the thin line closing the top of the "e". The tapered swoosh on top would be enough to suggest the top of the "e" at the same time would serve as the curve at the bottom. You only need to fix the top part of the letter. Once happy, cut the letter in half by using the polygonal lasso tool again and selecting "Layer via Cut" when you right click. Duplicate this layer and invert it. 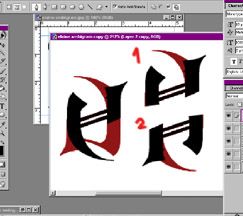 Now you can merge these two layers by moving them together and meeting on those two thin lines. Link the two layers by clicking on the little box beside the eye icon on your layers window and pressing Ctr+E. There it is, your double-sided E. Now you can erase the two E's on top of each other.  I'll stop here for now. This is getting pretty long. Part 2 is up and coming, don't worry! 1 Comments:
|
 strapped in @


Where can i find greek lettering styles? I can't find it on adobe photoshop. Need help plss.
my email
natrendell@gmail.com
thanks in advance